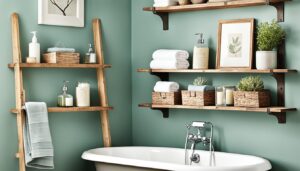
Have you ever thought about the magic of a bathroom makeover? How it could lift both the look and value of your home? Bathroom renovations with top-notch professional retiling services could be the perfect solution. Imagine a space that shines with style, simplicity, and function.
Say farewell to old tiles. Welcome luxurious, new, and tough tiles that turn your bathroom into a cozy retreat.
Key Takeaways
- Elevate your bathroom with expert retiling services.
- Professional retiling can enhance aesthetics and increase home value.
- Seamless and high-quality tile installations improve overall functionality.
- A bathroom makeover can transform your space into a personal sanctuary.
- Trust professionals for a high-quality upgrade.
Why Choose Professional Retiling Services?
Choosing professional retiling services is key to a great bathroom remodel. These experts make sure your tiles are placed perfectly and last long. They help pick the best tiles, design well, and use the latest methods. This makes your space look great and stand the test of time.
Going with pros avoids the downsides of doing it yourself, like crooked tiles or water leaks. They do the job fast, saving you time and stress.
Here’s why skilled installers are best for your bathroom retiling:
| Feature | DIY Installation | Professional Services |
|---|---|---|
| Accuracy | Inconsistent results | High precision and accuracy |
| Durability | Potential for early wear and tear | Long-lasting and durable |
| Time Efficiency | Time-consuming | Quick and efficient |
| Expertise | Limited knowledge | Expert selection and methods |
| Overall Experience | Stressful and challenging | Hassle-free and smooth |
Overall, hiring professional installers for your bathroom redo is smart. They ensure your renovation looks beautiful, lasts long, and is done efficiently.
Benefits of Retiling Your Bathroom
Retiling your bathroom has many advantages. It not only makes the space look better but also increases your property’s value. Plus, it uses newer materials and designs that fit your lifestyle better.
Enhanced Aesthetics
New tiles can really change how your bathroom looks. By picking stylish patterns and colors, you can make an old bathroom look new and modern.
Increased Home Value
Updating your bathroom by retiling can raise your home’s value. Buyers like updated bathrooms because they show the home is well-kept. This small change can be a big plus when you decide to sell.
Improved Functionality
Retiling your bathroom also makes it work better for you. Newer tiles can be slip-resistant and easier to clean. Retiling also lets you fix any hidden problems, making your bathroom safer and lasting longer.
| Benefit | Description |
|---|---|
| Enhanced Aesthetics | Aesthetic improvement can modernize and refresh your bathroom’s look. |
| Increased Home Value | Retiling can lead to home value growth by appealing to potential buyers. |
| Improved Functionality | Modern tiles often have slip resistance and are easy to maintain. |
Understanding the Retiling Process
Starting a bathroom retiling project is thrilling but can also feel daunting. Learning the key steps and how to install tiles properly helps make your project go smoothly. This leads to a successful bathroom makeover.
First, you need to take off the old tiles. While it seems simple, it requires special tools and skills to protect the surface underneath. This step is important to prepare for the new tiles.
Then, getting the surface ready is next. You need to clean it well, fix any damage, and make sure it’s flat. A well-prepared surface is critical for durable and good-looking tiles.
Waterproofing is a step people often miss but it’s very important. You have to apply a waterproof layer to keep water out. This makes your bathroom tiles last longer.
Lastly, you carefully place and fix the new tiles, then fill the spaces and seal everything. Being precise here makes sure your tiled area looks great and stays strong.
| Key Retiling Steps | Tile Installation Process |
|---|---|
| 1. Removal of old tiles | 1. Surface preparation |
| 2. Surface cleaning and leveling | 2. Application of waterproof membrane |
| 3. Application of waterproof membrane | 3. Placement and installation of tiles |
| 4. Tile placement and installation | 4. Grouting and sealing |
Knowing these key steps helps homeowners feel confident about retiling. This confidence can lead to a beautiful and lasting bathroom update.
Preparation: What to Expect Before Retiling
Getting ready to re-tile your bathroom correctly is crucial for great results. First, you need to clear the area. This means taking out old fixtures and tiles to make sure new ones stick well.
After removing the old tiles, check the surface underneath for any problems. You might find mold or areas that are weak. Fix these issues now to avoid trouble later and make your new tiles last longer.
Next, make sure the surface is smooth and clean for the tiles. You might need to sand rough spots and vacuum up dust. A flat surface is important for tiles to look good and sit right.

Also, think about how you want your new tiles to look. Planning your design and measuring carefully can help avoid mistakes. It’s also a good idea to have all your tools and materials like tile cutters and adhesive ready to go.
Good bathroom retiling preparation makes for a smooth retiling job. By preparing well, you can be sure your bathroom will look amazing and last a long time.
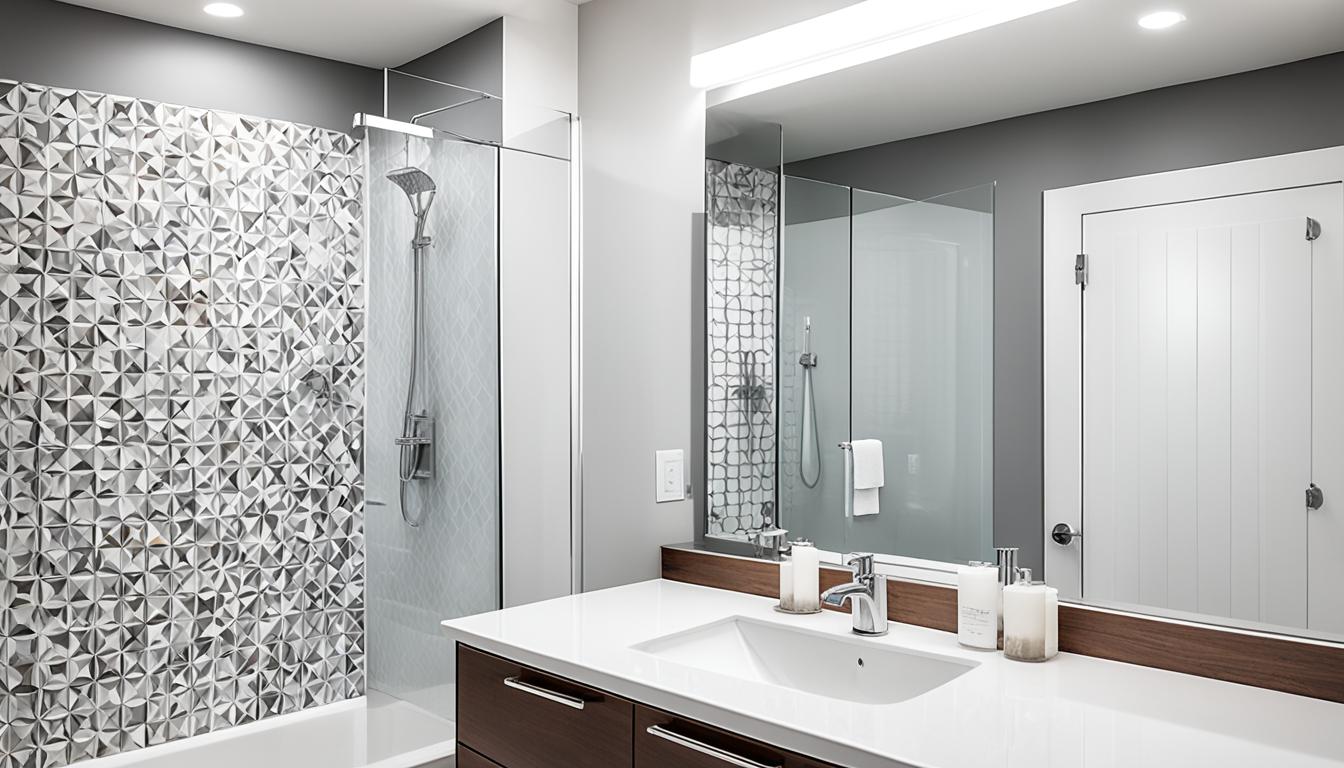
Selecting the Right Tiles for Your Bathroom
Choosing the right bathroom tiles is about mixing what you like with what you need. Let’s look at how to mix your taste, necessities, and personal flair. This guide will steer you right.
Tile Materials
Picking the perfect tile material is key for the bathroom of your dreams. You’ve got options like ceramic, porcelain, and natural stone. Here’s what makes each special:
- Ceramic: Good for your budget and works on walls and floors.
- Porcelain: Tough and great for wet spots, like showers.
- Natural Stone: Looks rich but needs extra care.
Color and Design Options
Choosing the right colors and patterns can totally change your bathroom’s look. You get to decide if you want the tiles to match or stand out. Think about these styles:
- Classic White: Always in style and very classy.
- Bold Patterns: They grab attention and spice up the room.
- Neutral Tones: Create a peaceful and calm feeling.
Durability Considerations
Tile durability matters a lot for everyday bathroom use. When you think about how tough your tiles need to be, look at these points:
- Traffic Level: Busy spots need harder materials like porcelain.
- Moisture Resistance: It’s a must for bathroom floors and walls.
- Ease of Maintenance: Go for tiles that are simple to clean and fight off mold.
Think about these tips to keep your bathroom both pretty and practical. This will help it stay in good shape for many years.
Bathroom Retiling: Step-by-Step Guide
Starting a bathroom retiling project requires a careful approach. Follow this guide for a perfect and durable finish. We’ll walk you through key steps like removing grout, cutting tiles accurately, and planning the tile layout.

Grout Removal
First, focus on removing old grout. Use a grout saw or multi-tool to slice through grout lines. This ensures a clean surface for new tiles. Always wear safety gear to protect yourself from dust.
Tile Cutting
Getting the tile size right is essential for a neat fit. Use a wet saw or tile cutter for precise cuts. Remember: measure twice, cut once to minimize waste.
Pro Tip: Practice on extra tiles to improve your technique.
Tile Layout
Planning your layout is key for a professional look. Dry-lay tiles first to find the best arrangement and reduce the need for cuts. Spacers help maintain equal gaps, and checking alignment helps avoid errors. This ensures the pattern looks great.
Importance of Waterproofing in Bathroom Retiling
Waterproofing is key when you’re retiling your bathroom. It stops moisture damage and keeps your tiles in good shape for longer. Bathrooms always get wet, so this step is crucial.
Without proper waterproofing, moisture hurts the structure underneath. It can cause mold, tiles to come loose, and even damage the building. Using strong barriers helps your tiles last longer and keeps your bathroom safe.
Use materials like membranes, sealant, and backer boards to make your bathroom stronger. These materials prove that good waterproofing is worth it. Your bathroom will last longer, saving you money and trouble.
| Material | Benefits |
|---|---|
| Waterproof Membrane | Creates a continuous barrier against moisture, preventing leaks |
| Sealant | Protects grout lines, further preventing water seepage |
| Backer Board | Provides a stable and moisture-resistant base for tile installation |
In summary, strong waterproofing is crucial for your bathroom tiles to last. It prevents costly repairs and water damage later on. This means you won’t worry about your bathroom for a long time.
Cost Factors to Consider in Bathroom Retiling
When you plan to re-tile your bathroom, knowing different costs is important. You should think about the cost of tiles, labor, and unexpected expenses. This will help you set a realistic budget.
Tile Costs
The tiles you choose affect the cost. You can pick from ceramic, porcelain, or natural stone. Each has a different price.
- Ceramic tiles: Generally affordable and come in many designs.
- Porcelain tiles: These are tougher and cost a bit more than ceramic ones.
- Natural stone tiles: They are high-end and have the highest cost.
Labor Costs
Paying for skilled labor is a big part of your budget. Good workers ensure the job is well done, but their services are not cheap. The cost of labor changes depending on several things:
- The scope of your project: Bigger or more complex jobs take more time.
- Location: Prices vary in different areas.
- Experience: Highly skilled tilers usually charge more.
Additional Expenses
There are other costs besides tiles and labor. These include:
- Preparation work: This means taking out old tiles, fixing the base, and waterproofing.
- Tools and materials: You’ll need grout, adhesives, and special tools.
- Unexpected issues: Sometimes, you might find problems like mold or need structural repairs.
Bathroom Makeover: Combining Retiling with Other Upgrades
A good bathroom makeover is more than just new tiles. It includes replacing old fixtures, adding better lighting, and putting in a new vanity. These changes work together to make your bathroom look modern and unified.
If you decide to put in new tiles, think about matching them with new fixtures and lights. Choose fixtures in brushed nickel or matte black to go well with your tiles. Good lighting can make your tiles’ colors and textures stand out more.
- Fixture Replacements: Switching out faucets, showerheads, and towel racks is key for a matching look.
- Lighting Enhancements: Adding lights around mirrors and in showers makes the space more useful and welcoming.
- Vanity Installations: A fresh vanity adds storage space and updates the bathroom’s appearance, completing the makeover.
It’s important to plan your updates together for the best result. This thoughtfulness not only makes the space work better but also boosts its appeal. A well-planned upgrade makes your bathroom welcoming and stylish.
Timeline: From Demolition to Completion
Understanding the bathroom renovation timeline is key to keeping your project on track. The process from tearing things down to the final touches includes many important steps. Each one is vital for making sure the renovation goes well.
Initial Consultation and Design
The first step is meeting with your contractor to talk about your ideas. You’ll decide on what you want, figure out your budget, and choose a design. This early stage is very important because it lays the groundwork for everything that follows.
Demolition and Removal
After planning, the next step is to take out old stuff like fixtures and tiles. This part usually lasts a few days. How long it takes depends on how big your bathroom is and how complex the work is.
Installation and Finishing
The last phase involves putting in new tiles, fixtures, and all the final touches. This part can last from one to two weeks. Knowing each step of the bathroom renovation timeline makes the whole process smoother.
Customer Testimonials and Success Stories
Happy customers often tell us how great our retiling service is. By sharing their stories, we give future clients a peek into our quality and service. Happy reviews show how new bathroom tiles can make a place look and work better.
A homeowner in California loved how we paid attention to every detail. They were thrilled with their beautiful and functional bathroom after renovation. This shows our team’s skill and the lasting value of our work.
A couple from New York shared their bathroom makeover journey. From start to finish, our clear communication and expert skills impressed them. Their story highlights how our work transforms spaces, giving clients great results.